Welcome to the Jungle

My Experiences In Education

EDCI 352 Multimodal Tool of Focus: Twine

Twine is an open source tool for telling interactive, non-linear stories. The flexibility of this tool is unique in that it gives students the ability to creatively understand information. Teachers that are committed to teaching in a multiliterate way help students learn how to move within and among different modes of text and how to relate it to their learning (Borsheim et al., 2008). Teachers who effectively apply new technology in their classrooms prepare students with multiliteracies for the real world. The students in our classrooms are flexible, digitally literate learners who are excited to further develop their technology skills. Twine is an engaging tool and encourages critical thinking and effective communication skills. It is an excellent example of overt instruction, which helps students to organize class content into an interactive concept map. By combining text with images, videos and audio in Twine, students can transform their knowledge to best suit their learning style.

white squares on blue background showing major branching of story in Twine

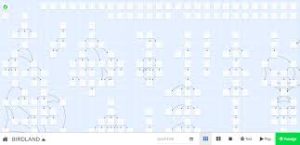
example of a branching story

Using a multiliterate perspective when teaching reading and writing engages students much more than traditional methods (Borsheim et al., 2008). Twine will target students struggling within the traditional teaching framework of reading and writing. They still gain the relevant skills, just in a more applicable and engaging way. Twine will also target students who are disinterested in school through its game-like design. This technology can scaffold further development of traditional skills while increasing a student’s technology literacy at the same time.


The Twine tool will benefit a wide variety of students. Visual learners can see how the concepts and information are interconnected. They can add their own connections and clarifications according to what makes sense to them. Also, it is easy to add images, video, colour changes and other visual aspects to the Twine storyboard. Students can bold and underline key terms. Auditory learners can utilize text to sound software to listen to the story or concept map they create. Music, podcasts, speech, videos, sound effects and other auditory content can also be added to their Twine. Reading and writing learners can use Twine in a more traditional sense by focusing on the written text that is within their storyboard. The interactive, creative, digital abilities of Twine make it easy to engage a variety of learner styles for classroom use.


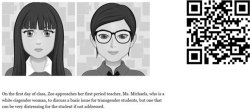
There are a myriad of ways to use Twine across many different subjects both directly for teaching content and for outside traditional curricular content. A large part of teaching is relationship building with students and ensuring your classroom is a safe and respectful space for all. (Re)Born Digital used Twine to tell an interactive story about a transgender student named Zoe. The story promotes learning about gender identities, transgender etiquette and ethics and creates an environment that promotes positive self-esteem and student success. The teacher is crucial for setting the tone and environment of a classroom. Twine allows the story to be interactive and flexible. It allows information to be understood in a clear manner. This lesson about transgender students and others like it are applicable for all teachers and classrooms.

image describing story about zoe a transgender student twine storyboard


Twine can be used to teach and assess students across many subjects. In English and Language Arts, students can map out a story they have written with multiple endings, depending on choices the reader makes throughout the story. In a Social Studies class, students could map out an election and how policies or funding is likely to change depending on who wins with a minority or majority government. In Science, students could tell a story about the process of plant growth with adjustments depending on sunlight or water levels (Online Tools for Teaching and Learning). Michelle Jileson developed a lesson where students design a story to learn about the body systems and how they interact with each other. Students develop their programming knowledge while using correct terminology and content to tell a creative story about the human body. This would be an excellent end of term project in Anatomy and Physiology 12. Students could showcase their knowledge of the human body systems and how they interact with each other.

twine storyboard with climate change


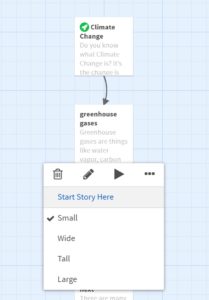
Although I have limited experience with Twine, I plan on gaining proficiency and aim to utilize it with students in the future. During the tutorial class within EDCI 352, I made a story about the day in the life of a salamander named Larry. Even though my story was very simplistic, I was able to learn how to add audio, images, videos, links and change colours all in about an hour. In my EDCI 767 Teaching Science class, I am going to include Twine as an assignment option as a means to explain healthy eating and the impact of diet on human health. I would like to further explore and learn about Twine so I can troubleshoot for my students and explain how to use the program in a clear and concise way.


While Twine has many excellent applications for enhancing student learning, it does have some drawbacks. The most obvious drawback is the hardware required to run the program. Students need access to a computer and to have basic technology literacy to use the software effectively. Not every school has enough computers for each student to gain proficiency in Twine and use it to develop projects. It will also take some lesson time initially for students to learn how to use Twine before it can be used in an instruction setting. There are a variety of great videos and tutorials on how to use Twine for beginners and advanced users. Teachers should make sure they are proficient in Twine first in order to best support their students. Another potential drawback is that students could get caught up in changing stylistic aspects rather than focusing on the content. If the class goal is for students to become proficient in Twine or if they are learning it within a technology class, this would be less of an issue. When using Twine as a way to demonstrate knowledge, a teacher should direct students to finish the content section first before adding creative stylistic attributes.


Twine is an excellent, multiliterate tool for the classroom. It allows the student to use creative storytelling to learn about a variety of topics in an interactive and unique way. It represents a method teachers can use for overt instruction while transforming the learning process. Twine will benefit a variety of learners and learning styles due to its flexible and engaging design to help students learn outside of the traditional methods. A student requires a computer to use this program, however the software is free, thereby reducing the financial barrier. I am excited to use Twine in my classroom in the future as I strive to adopt a multiliterate approach to teaching my students.

Resources:

Twine

Borsheim, C., Merritt, K., & Reed, D. (2008). Beyond Technology for Technology’s Sake: Advancing Multiliteracies in the Twenty-First Century. Journal of Educational Strategies, 82(2), 87-90. 

Miles, A. M., & Jenkins, K. (2017). (Re)Born Digital – Trans-Affirming Research, Curriculum and Pedagogy: An Interactive Multimodal Story Using Twine. Visual Arts Research, 43(1), 43-49.

Introducing Zoe

Online Tools for Teaching and Learning (designed by students from UMass blog), English/Language Arts, Socials, Science, etc

Michelle Jileson: Educator with BSc and BEd

The Adventures of Larry the Salamander

Twine for Beginners

Twine Advanced: How to Create Adventure Games Using Twine

Additional Resources Not Included in Essay:

10-Minute Teacher Podcast: Game Based Learning and Twine @coolcatteacher 

Transcript from @coolcatteacher’s podcast above

Student Twine Games Collection and Resources

Using Twine in the Classroom by Shaun Ferns

Twine Guide Wiki

Article from Wired about Twine and Bandersnatch


Week 10 Reflection, Finishing Up Those Competencies!

As we near the end of the semester, I have two final competencies to explore on this EdTech blog, Image Editing and Assessment. I have been editing pictures throughout the semester when adding images to my pottery blog, but I was able to develop this competency further through a tutorial offered in our EDCI 352 class where we learned how to use Canva. Canva is a free application where you can design and edit all kinds of infographics, posters, reports, social media posts and others. I am not sure if this technically qualifies as image editing, but your end product after using Canva is often an image/picture tailored to your specific requirements. This was an excellent tool to learn to use. While in class I designed an infographic about meditation according to our tutorial specifications. In my previous job as a lifeguard and deck supervisor, I would often make infographics to post around the pool and fitness center to provide information about upcoming events like “Lifejacket Day” or “Drowning Awareness Week”. I would usually struggle along on Microsoft Word and try to make a colourful, engaging graphic but they were not what I envisioned. When I go back to work, I will definitely use Canva instead.

Can Short Meditation Benefit Beginners_

meditation infographic


I will also be using Canva as a student tool in my future classroom as an assessment tool. I am currently planning a unit in my EDCI 767 How to Teach Science class about Lifestyles Differences. For the Nutrition section, a project could be to design a basic infographic that could be included in schools or doctor offices describing how to build a healthy diet, or clearing up misconceptions about carbohydrates as “unhealthy”. I could also use it in my Sleep section, where students could design an infographic about healthy sleep habits. They can demonstrate their knowledge in a practical and creative way!

We have discussed formative and summative assessment many times in our various courses with the benefits and short comings of both. Moving forward as a pre-service teacher, my goal is going to be to use a combination of these two assessment methods but stepping outside the box in terms of mode of assessment for both categories. I see myself using formative assessment as ongoing and casual assessment, where I hope all student will do well as I see it as more of a reflection on how well I am teaching the material on a day to day basis. I will use formative assessment as a day to day method of assessment. I will facilitate class discussion during my lessons and use a lot of small, quick, low stakes quizzes to constantly evaluate my students each day to learn how they are understanding the content I am teaching. This way, I know what to focus on for the next day’s class and where students need clarification on content. I will also be able to use formative assessment as final projects where students can develop and explore areas of content they find most interesting. I want these projects to further learning as compared to just showing me they saw all the content I taught them. Some of my favourite projects in school were when I got to pick the topic. In university in my biology classes, if I had a choice I would always focus on an organism I was passionate about. I wrote several papers and completed several projects on coral reefs, salamanders, the intertidal zone and insects as those are the things I feel most passionate about. By giving students the freedom to explore through inquiry in this formative assessment method I hope to get them psyched about school and learning!

myself in a white tshirt and purple pants in a forest holding a salamander

I found a western redback salamander in Goldstream!

That being said, summative assessment is also important. This might just be my bias as much of my learning has been assessed through summative exams, but I find a lot of value in the ability to study and show a broad breadth of knowledge. As a highschool teacher, I am also preparing my students to be successful in their future careers and potentially at university. As of now, a lot of assessment at the university level is summative exams and assignments. I think it is crucial to give students practice in these methods so they can learn good study habits and testing skills for their future endeavours. If my students show up to their first Biology Midterm with no previous practice writing an exam, I would feel as though I had failed to teach them all the skills they needed. I am confident that I will be able to use a mix of both summative and formative assessment to adequately assess knowledge while still encouraging passion and further learning in my students!

Last Day of Throwing and Last Batch of Finished Pieces

Monday was my last day of throwing for my inquiry project. I had a really successful day and I am very happy with the number of pieces I made in the two hour block. I decided not to make my large bowl this week, as I am going to give some of my pottery away for Christmas and I wanted to make some extra pieces in preparation. I threw 7 pots and 3 bowls. One of those pots and the small bowl is going to become a sugar bowl and lid for Goal 3! I ripped the side of one of the larger bowls I made this week but hopefully Ann will be able to fix it up for me before trimming next week. If not, I will just cut that section off and make a more shallow bowl than planned. I also experimented this week by adding designs to the wet clay instead of waiting for trimming day. I pressed a few stamps into the wet clay, which was much easier and faster than hand carving it during the trimming stage. I’ll have to see next week how it turns out!

side view of several light brown pots and bowls of various sizes on light brown cork board

birds eye view of 7 pots and 3 bowls, light brown clay on light brown cork board, various sizes

birds eye view


I also picked up my finished glazed pieces from the week before, and the glaze combinations with my flower pots came out better than my wildest dreams. This first piece is my honey hive cup for my friend. I hoped the glaze to turn out more pink, but the white has really nice coverage and the shape is still great.

light brown and white beehive style cup on brown carpet

These first two flower pots had no additional carving or pattern but I made a beautiful pattern by splattering the glaze. The glaze also melted down the pots in the kiln adding to the unique design.

blue and green flower pot on carpet

slate blue flower pot on carpet


The second two flower pots I added a sunflower design. This takes a really long time to glaze as you have to paint on the glaze of the flower three times, and then cover it in a coating of wax before dipping the main pot. I tried adding a bit of red underglaze to one of the sunflowers to give the petals more character. It turned out beautifully! There was quite a bit of blue glaze dripping/melting however that went right over the petals, so next time I will be more careful with the splattering and avoid dripping blue above the sunflower.

flower pot with sunflower, splattered with blue and teal on carpet

flower pot with sunflower, blue and green colouring


I am excited for trimming my sugar bowl next week! Lids are very tricky and I have not attempted one for over a year, so I am looking forward to seeing how far I have progressed.

EdCamp and Virtual Reality

The EdCamp this week was a strange but great experience. I was feeling quite tentative going into the EdCamp, as I am definitely someone who likes more structure. I joined the breakout room on Phone in the Classroom, and the discussion started out as a chat between student’s experiences in seminar so far, and the tips and tricks they had learned from supervising teachers. I was a little disheartened by the number of people that had their cameras off, Zoom fatigue is a challenge we all face of course but I found myself much more connected to the strangers that I could see than the 10 or so people who did not really contribute or turn their cameras on. Jesse Miller joined the group near the beginning and had a ton of knowledge to share through his experience as a nationally recognized authority on social media awareness and education. He gave a presentation to our class earlier in the semester so some of the material was a repeat but still very interesting. The first thing he brought up was “Kahoot Bombing”, as we had been speaking about how much we liked Kahoot as a classroom tool for student engagement. I had heard of Zoom Bombing but I had no idea that Kahoot was so much more open to this phenomenon. Students are putting the class code up on Reddit or other social media, and the class gets ruined by spammers joining the quiz. They can bypass school wifi restrictions by using their own data, record the chaos that ensues and then post it on youtube. I would hope in the future that I would have control over my class to the point that I could still use such a great program as Kahoot but it is something to be aware of as a TOC where kids are trying to push buttons.
I liked the idea of a contract or list of expectations for kids to set boundaries at the beginning of the term that some teachers use. Treating your students as competent and mature is more likely to gain you respect for your class and your expectations than micromanagement. One teacher used a pattern of 20 minutes of classwork, then 3 minutes of phone time during their class. Students had to focus for those 20 minutes, and if one student was caught looking at their phone the whole class lost the privilege for the rest of the block. Typically I am not a fan of punish all to punish one, but I would like to implement something similar to this in my future classroom. It keeps students accountable for their own actions and helps them practice self regulation, a crucial skill they need to develop.

I stayed in the same breakout room throughout the call as I was having tech difficulties moving myself through the breakout rooms, but it stayed quite interesting for the hour long session. If Jesse Miller hadn’t been there to help guide the conversation and share his expertise, I would have been more likely to move and explore other rooms but I was really interested in what he had to say.

I decided to do some research on virtual reality (VR) and augmented reality (AR) this week and explore the differences and what is out there. I didn’t understand the differences between the two modes and I was curious to find out. I found a great video on the course website from a past class that describes both quite well called Understanding VR and AR. VR is when a user wears a headset, and the software uses head tracking so that when the user turns their head, they can look around their environment. You feel as though you are physically immersed in the game or world. AR is when digital elements are added to a live view, with a visor or through your smart phone. A common example of AR is Pokemon Go. The pokemon are added on top of the real world through your smart phone screen. They both have all kinds of fascinating uses! Surgeons can use VR to practice technical surgeries, and you can do a virtual immersive walk through tour of museums and other locations. People can use AR to translate foreign languages in real time by holding up the device to a road sign or street name.

These technologies have all kinds of amazing applications for education. This article from Getting Smart called “The Future of VR and AR in Education” lay out some great examples. Allowing students to learn in an immersive environment has been shown to result in increased retention of information, like through projects, labs and field trips. Through VR, students can explore museums and historical sites around the world without leaving the classroom. It can also contribute to inclusion, as students can make personal adjustments for various abilities, therefore enabling them to participate fully with their peers. Language translation can increase global communication and understanding! How cool would it be to work on a project with a group of students in another country, without relying on speaking the same language. The opportunities are endless and I am very excited to see where it all goes.


Glazing Tip: Write it down!

I was back to glazing this week to finish up those flower pots and the mug for my friend. Since I handed in the flower pot with the carved salamander late, it was not bisqued in time for glazing this week so I will do it the next time I have a batch! I experimented with some new colour combinations this week that I am very excited about. I find the blues and greens meld together beautifully in the kiln, resulting in almost a melted look. Whenever I glaze a piece, I write it down in a little book I have so I can track which combinations I like and which I do not like.

small book held in hand, blue cover with 3 types of whales, skeletons of whales below

glazing book

two pages within a small book detailing past glazing colours

past glazing choices


This is the page from this week.

inside two pages of glazing book detailing last weeks glaze chioces

this week’s choices

This Monday, I am going to have my last throwing day before the end of term. I am hoping to throw my large bowl for Goal 2, and try making a sugar bowl for Goal 3! Matching lids to containers is really tricky so this will be great practice while putting me out of my comfort zone .

Open Education and Personal Learning Networks

Open Educational Resources provide opportunities to improve quality of learning and knowledge on a local and global scale. It removes barriers like your location, time zone, schedule or cost to build your education. UNESCO states, “universal access to information through high quality education contributes to peace, sustainable social and economic development, and intercultural dialogue”. People of all abilities can now access education with less barriers through these open resources. On a personal scale, I have found excellent resources from BC high-school Biology teachers that have made their lessons open sourced. I have learned how detailed to teach topics for each grade level with clear, informative graphics to include. A teacher from Burnaby has a great website showcases tons of resources. It is such a huge help to new student teachers who are learning how to design lesson plans for the first time to see how experienced teachers set up their class. Another great resource is from Creative Commons Open Educational Resources (Commons OER). A lot of their resources are from American schools and curriculums, but still very applicable. I found an awesome lab teaching blood typing from the Alabama Learning Exchange within Commons OER. The lab teaches students ABO Blood Typing and how this connects to blood transfusions. Open educational resources are even more powerful when you take into account how teaching has moved into online formats. Today in my morning observation class at Claremont, the teacher directed students to a website on circuits for their Grade 9 Physics unit. They were able to practice making parallel and series circuits with batteries, switches and lightbulbs in class, and then could go home and continue to explore with this free, open program online. They can visually map out their homework to help increase understanding. I used open source textbooks while in my undergrad degree at UVic to help save costs, it was not always the exact text I needed, but provided the right information and saved me several hundred dollars. Open Textbook Library has a database of 806 textbooks right now that are licensed by authors and publishers to be freely used and adapted. Another great site is BC campus OpenEd, which shows where to find open textbooks more curated towards BC curriculum.


As we move through the program, building our Personal Learning Networks are going to be crucial to help with job hunting and development. I have been mostly an observer on Twitter thus far, and while I can take a lot out of posts I am reading, I do not feel in my current position that I have a lot of value to contribute to the discussion. I know that as my career develops and my knowledge increases I will feel like I can contribute more, but currently I am very happy simply to learn with an open mind. At that point I feel that Twitter with be of more value towards my Personal Learning Network. I expanded my ideas around Personal Learning Networks from the two options listed in our competencies checklist to include the relationships I am forming with supportive teachers in my seminar days on Wednesdays at Claremont. While not strictly tech based I am finding these relationships to be so valuable in my development as a teacher and practice knowledge I am gaining. I have found three main teachers that I have a strong connection with, and I learn almost more on Wednesdays than any of my classes just by watching their class management, how they structure their lesson and how they are teaching their content. They are giving me opportunities in their classes to teach and interact with their students. These relationships are currently my strongest representation of a Personal Learning Network where I am connecting and interacting with the educational community.


Salamander Flower Pot

This week I finished trimming my 4 flower pots, one large pot and a small cup. Sometimes during this trimming stage, I carve designs into the sides of my pieces. This makes the designs look much clearer and  makes it easier to paint them with glaze. I carved a sunflower design into two of my flowerpots. This sunflower design is a classic of mine. Sunflowers are one of my favourite flowers and it is a quick design to carve now that I have done it several times. The small cup I trimmed into a honey pot shape, by request for a Christmas present for a friend. I ran out of time at the studio, so I decided to bring my large pot home with me to carve. I put a large salamander along the side of the pot, and I will bring it back to the studio tomorrow so it will be ready to glaze next Monday.

light brown pot held in hand with salamander carved into side of pot.

Finished Products!

All the pieces I’ve been working on over the last month came out of the kiln this week! I am really happy with the results. I have completed part of Goal 1, which was to make 6 new plates for my own personal use similar in size and shape.

6 white plates, 3 with two blue fish and one red fish in the middle of the plates, 3 plates with one red salamander and one blue salamander chasing eachother's tails

new plates

These next two pots/vases were simply practice for throwing, trimming and glazing. I really love the colours that turned out for these.

blue and white vases on wooden table

This little bowl was what I made when I tore a vase while throwing, and matched with the second vase I was experimenting with glazing colours.

small bumpy bowl in blue and white, bigger vase in blue and white as well on wooden table

Finally, this was the trial run of my first of five flower pots! It turned out beautiful, it is one of my favourite glaze combinations.

blue and green flower pot outer view on wooden table

blue and green flower pot on wooden table, view is into the pot


I also threw 4 more flower pots this week and attempted to make a large pot. This will be the trial run for the large fruit bowl I am making for Goal 2. I will show them next week when I am trimming.

Reflection Week 7: Minecraft and Communication

We had a teeny tiny class this week of only about 6-7 students as quite a few were at one of the conferences. A cool topic we were able to explore was MinecraftEDU! I personally really enjoy playing Minecraft casually. When I was growing up, I did not play many video games outside of a few computer games and at friends’ houses. My boyfriend Graydon introduced me to Minecraft as a fun game we could play together where we build elaborate tree forts and raise multicoloured sheep. The creativity is truly endless. I had never thought of Minecraft in an educational way however until Graydon and his friend used it in a school project (link to youtube video) for their Nursing degree. They made an interactive world where the user goes into a giant person and works their way through the human body with different information posted along the way. It was meant to help educate a young person who needed to get an ileostomy or ostomy bag. When you got to the small and large intestine of the giant person, you learned about the process and what was changing in your body. At the end, you then have the code to make your avatar for future Minecraft games have an ostomy bag. It was a creative and interactive way to teach someone about ostomies and ileostomies that was relevant to a younger person. This really piqued my interest in using Minecraft for education. It was awesome to learn from Luke that there are pre made lesson plans already set up and designed for educational use! I had a good look through all of the premade science classes, and while a lot of them were targeted for younger ages, there is a great one for exploration of eukaryotic cells. I will definitely be striving to use this resource in my future classroom (if my students think it is “cool enough”).

colourful picture of a computer avatar in a tree with a blue sky, in 8 bit rendering from minecraft video game

example of a minecraft world

In the Communication Competency, I am feeling quite adept with Zoom and Mattermost at this stage of the semester. Putting a personal background on my Zoom account really improved my Zoom experience. I was feeling quite stressed about the ability of people to be staring into my apartment, and if I had cleaned up my laundry or put away mess that was visible. By putting a picture I took in the summer as my background, it accomplished quite a few things. I no longer feel stressed about however clean or messy my apartment looks, and I have no stress about my partner visibly walking into the room behind me. Every time I look at that picture, it reminds me of a really happy memory, and makes me feel like I am in a calm, coastal forest. I have also set up multiple personal Zoom calls with my classmates to practice for projects and for my pod meetings for EDCI 336. Through presenting projects for other classes, I now have a lot of practice screen sharing, sending people into breakout rooms, and engaging with others over Zoom visually, audibly and through the chat.

Mattermost has been a great new method of communication learned through this class. I typically use Facebook Messenger for group projects, but Mattermost makes it much easier to read and scroll through long message chains common in group projects. One of my classmates Aaron made a socials type channel for our cohort and a few others, which has been great for setting up hangouts and a general place to chat! The organization between public, private and direct messaging makes it very easier to keep track of multiple conversations. It works well for the Teaching Program as we all downloaded it due to EDCI 336. I hope to encourage others to use it later in my career as an easy method of communication between staff members or other TOCs.


Glazing! Time to Add All the Pretty Colours

This week I glazed my freshly bisqued pottery with a bunch of lovely colours! My friend Sydney came with me again as the photographer.

my six matching bisqued plates ready for glazing

The first step in glazing is to sand any rough edges off your pieces with a bit of sandpaper.

sanding plates with three vases finished


After everything is smooth to the touch, wiping all the pieces with a damp sponge removes the dust so the glaze has a smooth, clean surface.


Now the fun part! Dipping your pieces in glaze or painting it on.

glaze wall, showing all finished colour combinations with two main types of clay

It is really important to stir buckets of glaze super thoroughly, or the particulate in the glaze will stay in the bottom and the coating of glaze will be thin and discoloured. Glaze should look creamy when it is properly mixed. When I first started pottery, I would be so mad after when I thought I was going to get a beautiful dark blue or green, and it would look thin and watery because I did not mix the glaze enough. The glaze also does not look anything like its colour when it is in liquid form. The next video shows stirring of dark blue, but the liquid glaze looks brown. The high heat of the kiln activates the chemicals in the glaze to show the beautiful colours.


I started with my plates. I decided to paint on three fish with glaze on three of the plates for decoration, one red and two blue. When you paint on glaze, you need to do three coats to ensure the glaze shows up in the colour you want. When dipping pieces, more glaze is absorbed so just one dip per colour is necessary.


My other three plates I decided to draw and then paint on salamanders.


Once I had the time consuming pieces finished, I started dipping my flowerpot, 3 small pots and bowl.


Two pieces here have been double dipped and two are waiting for their second coat.

nearest pieces double dipped, far two pieces waiting second coat

One salamander will be blue and one will be red on each plate.

finishing blue glaze on salamander plate

Then I dipped my plates in opal, a clearish whiteish glaze that will make the rest of the plate smooth and give it a white colour while still letting my painted designs show through.


You must leave your pieces to dry before touching them or the glaze will come off on your hands, leaving a blank spot on your piece. Thinner pieces need longer to dry as there is not as much to soak up the glaze. I enjoy dipping my pieces in two colours, so you get a bit of both glaze, and the combination in the middle. Once your pieces are finished, you must wipe the bottoms clean. If you left glaze on the bottom of your pieces, they would fuse to the kiln.


This batch is now ready for the kiln! I keep a record of which glaze combinations I use in a little book so when they come out of the kiln, I know which combinations I love and which I do not like as much for the next time I am glazing. My small bottle of red glaze I bought for decoration, as Ann does not have any red glaze (apparently very difficult to make). All of these pieces will be food safe, dishwasher safe and oven safe! I tried some new combinations this week, I am excited to see how they turn out!


I used the same editing software iMovie as last week, and the same great jazz tune by KieLoKaz from Free Music Archive.

« Older posts